Multiple Actors Driving One Rig Simultaneously

Quick Combined Actor Test

This is an example of using mocap to drive a character with extra limbs.  I tested this back when I was a student, and have since developed this into a full-fledged method of capture and delivery.  Using this process, two people can be suited up to simultaneously drive one rig.  Throughout my career, I have used this method of capture in the development of content for both Call of Duty, as well as some recent work on Guild Wars 2.  Due to restrictions at Activision, I am unable to post the work that was done there...however, once some GW2 content has been released, I will be posting a breakdown for the most current iteration of this process.

The video above depicts the outcome of my first foray into this method of capture and delivery.  In this test, I captured all aspects of the character myself, splitting the move across 2 captures rather than driving everything all at once with another actor.  In the first shot, I drove the whole body.  In the second, I acted out the movements for the additional arms.  Timing was accounted for on the shoot, and data was then solved and hooked up to the 4 armed character rig in MotionBuilder.

Mirror Animation

Mirror Animation (with preview and separate body part options)

This Mirror Animation tool allows you to mirror full body, individual body limbs, and/or sections of animation on a character rig.


The tool is composed of 4 sections; the first being motion file and character rig selection.  All selectable character rig options are drawn from project folders, that exist in a set folder structure that I have put together for the studio I work at.  These character rigs are all grouped based off of project, and as you select a project in the project dropdown, the character rig dropdown updates with all of that project's current character rig options.  The selected character rig will be added to the scene, and it's animation will be set to whichever FBX motion file is selected using, the '...' file selection button.

In addition, the tool has a refresh button.  This is the green button next to the character rig dropdown;  Said button will update the scene should an alternate character rig be desired. 

A few sections contain expandable UI elements:


that give the user more mirroring options.  Every option available can be previewed before the tool ultimately bakes animation down to the character skeleton and exports out an FBX file. 

Additionally, this tool supports version control, as the studio it was developed for had multiple projects that all used different versions of Maya.  Older versions of Maya and MotionBuilder will not recognize newer files; for instance, Maya 2014 will not recognize an FBX saved out by MotionBuilder 2018.  FBX's are the file format used by a custom Animation Importer that I had written to import mocap data onto our character rigs inside of Maya, and these FBX's need to be the same version of whichever Maya the animator was working in, so all exporting from MotionBuilder has to support generating FBX files of all version types.


Once a motion file is selected, the name and location of the new mirrored animation file are listed at the bottom of the tool.  (The mirrored file will be saved out in the folder that the original motion file was selected from.)

The 'Mirror Options' section of the tool contains all body mirroring options:  full body, upper body, and lower body.  As an option is selected, the character will automatically update in the scene:

Ex:  Full body:


The upper body can be further broken down into three individual options:  left arm, right arm, and head.


In addition, the tool also allows for mirroring portions of animation via the 'Mirror Portions of Individual Limbs' section.  In most moves, esp. any that involve the character walking or running, you would not want to mirror only the upper or lower body, as the arms will no longer move correctly with the legs when the character is walking.  However, if there is a portion of a move that you want mirrored from one arm to the other, for instance the character is walking and blasts a beam from his left hand, but you want it to blast from the right, the tool allows for this sectioned mirroring.

When one of the section selection buttons is clicked, an anim layer for that particular limb is created in the scene:

Inversely, if the button is deselected, the anim layer is removed.

This new layer is where keys should be set to mark out which portion(s) of the animation should be mirrored on the layer's respective limb.  Once all keys are set, clicking the 'Enable' button for the appropriate section...


...will establish a preview of all mirroring for the sections of the animation denoted by the layer's keys. 

The tool assumes the user is selecting portions of animation that will mirror with minimal pops, and will smooth out all mirror blend spots after all aspects of mirroring have been confirmed by clicking the 'Mirror Animation' button.

The 'Clear Keys' buttons will clear the keys from their respective anim layer, as well as select the layer so that the user can rekey the portions of animation they want mirrored.

In addition, the 'Problems keying?  Click Me' button can be used to troubleshoot any keying issues.  This button selects all joints associated with the character in the scene, which gives the user something to key.  As long as one joint in the skeletal hierarchy of the character is keyed, said key will be acknowledged by the tool when determining which portions of animation to mirror for the anim layer's given limb.

Lastly, if the UI window should be closed without selecting to 'Mirror Animation', the scene will be cleared of all animation, animation layers, etc. (via appended code to the window's close event).

Anim Curve Reduction

Solving motion capture marker data to a skeleton typically produces 3 animation curves on all driven joints in said skeleton.  Unfortunately, this is the case for all joints including those that you want to rotate along only one axis, ex:  the elbows and the knees.  Some solving methods require locking joints, for instance locking degrees of freedom on HIK characters, or IKinema's ability to directly disable solving to a joint's different rotational axis.


Other solving options, such as those used by Motion Analysis, use their own skeleton file types for solving.  In these cases, the joints on these skeletons can be identified as particular joint types that are used to limit the way a joint rotates while mocap data is solved.  For instance, an elbow can be set to joint type 'Hinge' where it's rotation is limited to an axis of rotation.  This particular method still produce 3 animation curves on all joints, where even if the joint appears to only rotate along one axis, it still has animation curves on all three:


An effective solution for this must respect and maintain all joint placement as defined by mocap data, while also limiting the rotational axis of all necessary joints.  Using the elbow as our example:  we would need to be able to adjust said joint’s range of motion, limiting it to rotate along one axis only, while compensating for this limit by adjusting the rotational values of the shoulder joint, in order to maintain all arm joint positioning.

A tool that I have dubbed the Anim Curve Reduction tool:


offers a solution for this, in which a series of constraints are all set up to adjust anim curves on the elbows and knees of a given character rig, limiting their rotation to one axis (in this example, the y axis).  All aspects of this process are automated, and consist of the following steps:
  • After the desired file has been opened in the scene, we merge in another copy of the file as reference.  This is going to leave us with two copies of the same animated character rig: 
    • Our base character rig – the one that we will be adjusting
    • Our source character rig – the second rig, that serves as a template to ensure the joint’s don’t deviate from their proper positioning
  • All constraints are set up*
  • The base character rig is baked down, and the scene is cleaned up:
    • Constraints are deactivated
    • Source char rig and constraints are removed from the scene

*Lets break down the constraints used on one of the limbs, sticking with the right elbow as our example:

The script will create a null and snap it to the location of the source character rig.  Depending on which axis has been selected as the bend axis for the joint, it will then translate the null back along the appropriate axis, moving it back behind the joint (in this case, translating it backwards along the z axis about 15 units).  Finally, the null is parented to the source character rig’s right elbow joint.  This will serve as a pole vector object, guiding the base char rig’s right elbow joint.


From there we set up two constraints:

-One, a simple parent constraint, in which the source character rig’s right wrist joint drives the base character rig’s right wrist joint:


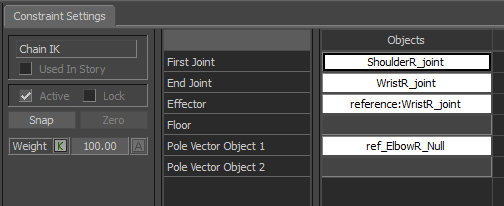
-The second, a chain IK constraint; this consists of setting the constraint's 'first joint' as the base character rig’s right shoulder joint, the 'end joint' as the base character rig’s right wrist joint, the 'effector' as the source char rig’s right wrist joint, and the 'pole vector object' as the null we had created and parented to the source character rig’s right elbow.


In code, this is as simple as instantiating a chain IK constraint (via the FBConstraintManager), and appending all the necessary components:


Once all components are placed, you can access and adjust all constraint settings via its PropertyList.
For instance, we want to ensure that this chain IK constraint has an ikRPsolver, 0 twist, and a pole vector value where all but the z values are 0 (being that we translated along that axis).  In code, we would find and set the data for these attributes:


These two constraints work in tandem to keep the right arm positioned as it was, but limit the elbow to its one core axis of rotation:


All while reducing its anim curves.

Before:

After:

Additionally, this method also works to alleviate any awkward twisting or bending:


Pose Instance

Poses are key while animating, and are equally important when shooting mocap.  Whether it is helping to start and end on a loop, providing a mark to hit during a sequence, etc., having poses for actors to match up to in real-time can ensure a major time savings for an animator post process.  Additionally, it can be invaluable to have a way to generate poses on the fly while shooting, especially if the shoot consists of new animations where important poses for an animset are being defined.

Generating these poses in MotionBuilder can be a fairly simple process, in which all one must do is replicate a real-time driven character rig, and snap all of the duplicate character rig’s joints to their real-time rig counterpart. 

The Create Pose Instance tool does just that:


The UI for this tool is composed of:
  • a character selection dropdown - this lists all current character rigs in your scene
  • a refresh button - refreshes the character selection dropdown, should you introduce any additional characters into your scene after opening this tool
  • a pose material color dropdown - this lists color options for the pose
  • a ghost mesh checkbox - if checked, a lighted shader will be applied to your new pose, making it transparent

To start the process off, I first instantiated a collections OrderedDict.  This OrderedDict is an easy place to store and access all original char rig joints, the duplicate char rig joints, and the constraints that we will use to snap the dupe joints to their original joint counterparts*.  We use an OrderedDict so that the order in which we append joints to the dictionary is maintained, so that joint hierarchy is respected as we alter joint positioning (ensuring we move parent joints before their children). 

With the particular character rig identified, we can parse through all of its character links, appending them to the OrderedDict as we go.  Doing so, we introduce joints to the dictionary with respect to their place in the skeleton’s hierarchy, ensuring everything is top down.  For this snippet of code, 'charName' is the variable assigned to the user selected character in the scene that we want to create a pose for:


Additionally, we use a try and except to bypass any links that do not contain any objects, and eliminate any potential errors.


*One of the easiest methods I have found in MotionBuilder to snap an object in the scene to the location of another object is by the use of simple parent constraints.  When you set up said constraint, and activate it, the constrained object immediately assumes all translation and rotation values of its source object.  We could just as easily go in and snag the FBVector3d values for the source object’s translation and rotation properties and assign them to the constrained object…but in this case, the added bonus for using these constraints is that we eliminate any potential risk of accidental offsets.  Since the constraint remains active as we work our way down the skeleton hierarchy, the joints are effectively locked down after they’ve all been placed properly, ensuring none of them can be altered until after all joint locations have been updated.


Once all joints are set, the constraints can be deactivated, and deleted out from the scene.

Typically, if a character rig is being driven by streamed data from a motion capture software package, the time frame in MotionBuilder will not be altered.  However, this tool has appended code that takes into account the scene current time frame.  As an added step, the tool will evaluate your scenes local time span (start and end frame), as well as the current set time frame.  Before the joints of the duplicate character rig are adjusted, the tool resets the scene's local time span, and uses FBPlayerControl to go to the proper timeframe, making it so you can use this tool outside of real-time altogether.

In this example, the script was set to read the current time frame, and assign it to the variable ‘currentFrame’.  The scene start and end frames are also assigned to the variables ‘startFrame’ and ‘endFrame’ respectively:


As previously mentioned, a little add on that can be done is adjusting the pose mesh’s transparency, to differentiate it from any other character mesh in the scene, and make it easier for an actor to line up with.  The tool does this by assigning a lighted shader to the pose’s mesh, and adjusting the shader’s transparency and alpha settings.  In this example, ‘self.poseRigLightedShader’ is the variable to which the shader has been assigned:


Real-time rig:

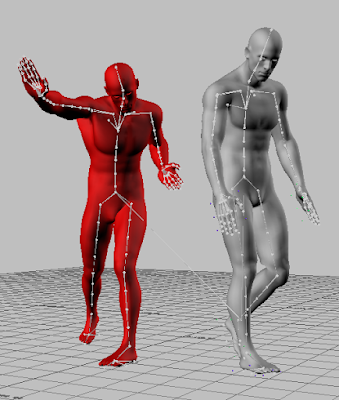
First pose applied (colored red):

Second pose applied (colored green, and ghosted):


Retargeter

Retargeter (MotionBuilder character retargeting, with added components)

This Retarget Animation tool makes use of the character system in MotionBuilder, as well as additional components that can be defined within the tool, to retarget animations from one character skeleton to another. 

As a general practice, it is important to note that optimal character settings will differ as you retarget from one character rig to another.  It is recommended that you merge both character rigs into a scene, optimize the character settings for your retarget character rig, and save out the retarget character FBX file before batch retargeting.  This tool assumes that all character rig files have been set up in this manner.


First, select a folder from which to retarget animation, as well as the character rig to retarget animation onto.


To batch all FBX files in the selected folder, check the 'Batch Retarget' option.  If retargeting a select number of files, you can select a specific file by clicking the 'Add Entry' button, and selecting said file in the created widget:


Each widget consists of a dropdown, containing all FBX files found in the selected motion file folder:


Additionally, all entries are selectable with a mouse click.  A selected entry is highlighted:


and can be removed from the list with the 'Remove Entry' button.  The 'Remove All' button will clear out all entries.


MotionBuilder character retargeting only supports retargeting animation onto the core body joints of a character rig.  If there is a need for additional joint retargeting (such as attachment joints, extra limbs or tails, etc.), you will want to make use of the 'Extra Components' option. 


Once enabled, you can select to retarget finger animation, and/or create new retargeting components.

To create an additional retarget component, click the '+' button.  A supplemental UI will pop up:


To begin, click the 'Prep Scene' button.  This will create a new scene in MotionBuilder, composed of the desired retarget rig as well as a motion file from the selected motion file folder.  In this scene, identify the retarget rig joint, as well as the joints on the original motion file char rig that should be driving it (aka source joints).  You have multiple options regarding how you want your source joint(s) to drive the selected retarget joint:
  • Rotation:  supports single source joint; Source joint's rotation will be transferred to the retarget joint.
  • Direct Parent:  supports single source joint; Source joint will directly drive the selected retarget joint.
  • Rigid Bodies:  supports multiple source joints; Source joint positioning will cumulatively drive the selected retarget joint.

Once you have identified the retarget and all source joints, click 'Add Component'.  You will see the extra retarget component listed on the main UI of this tool:


After creating any and all additional retargeting components, identify which folder all retargeted motion files should be saved into, as well as FBX version type.

All retargeted files will be saved into the specified delivery folder, with a prefix of the selected retargeted char rig appended to their file name, and the version type FBX (specified in the dropdown at the bottom of the tool) as a suffix. 

Ex:  if the move was called 'magic_attack.fbx', the FBX version type was 'Current' (2018), and the move was retargeted onto a demo character rig named 'demoChar.fbx', the retargeted motion file will be named 'demoChar_magic_attack_2018.fbx'.