
Other solving options, such as those used by Motion Analysis, use their own skeleton file types for solving. In these cases, the joints on these skeletons can be identified as particular joint types that are used to limit the way a joint rotates while mocap data is solved. For instance, an elbow can be set to joint type 'Hinge' where it's rotation is limited to an axis of rotation. This particular method still produce 3 animation curves on all joints, where even if the joint appears to only rotate along one axis, it still has animation curves on all three:

An effective solution for this must respect and maintain all joint placement as defined by mocap data, while also limiting the rotational axis of all necessary joints. Using the elbow as our example: we would need to be able to adjust said joint’s range of motion, limiting it to rotate along one axis only, while compensating for this limit by adjusting the rotational values of the shoulder joint, in order to maintain all arm joint positioning.
A tool that I have dubbed the Anim Curve Reduction tool:

offers a solution for this, in which a series of constraints are all set up to adjust anim curves on the elbows and knees of a given character rig, limiting their rotation to one axis (in this example, the y axis). All aspects of this process are automated, and consist of the following steps:
- After the desired file has been opened in the scene, we merge in another copy of the file as reference. This is going to leave us with two copies of the same animated character rig:
- Our base character rig – the one that we will be adjusting
- Our source character rig – the second rig, that serves as a template to ensure the joint’s don’t deviate from their proper positioning
- All constraints are set up*
- The base character rig is baked down, and the scene is cleaned up:
- Constraints are deactivated
- Source char rig and constraints are removed from the scene
*Lets break down the constraints used on one of the limbs, sticking with the right elbow as our example:
The script will create a null and snap it to the location of the source character rig. Depending on which axis has been selected as the bend axis for the joint, it will then translate the null back along the appropriate axis, moving it back behind the joint (in this case, translating it backwards along the z axis about 15 units). Finally, the null is parented to the source character rig’s right elbow joint. This will serve as a pole vector object, guiding the base char rig’s right elbow joint.

From there we set up two constraints:
-One, a simple parent constraint, in which the source character rig’s right wrist joint drives the base character rig’s right wrist joint:

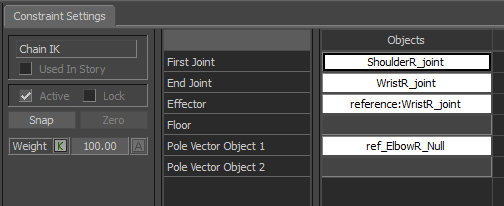
-The second, a chain IK constraint; this consists of setting the constraint's 'first joint' as the base character rig’s right shoulder joint, the 'end joint' as the base character rig’s right wrist joint, the 'effector' as the source char rig’s right wrist joint, and the 'pole vector object' as the null we had created and parented to the source character rig’s right elbow.
In code, this is as simple as instantiating a chain IK constraint (via the FBConstraintManager), and appending all the necessary components:

Once all components are placed, you can access and adjust all constraint settings via its PropertyList.
For instance, we want to ensure that this chain IK constraint has an ikRPsolver, 0 twist, and a pole vector value where all but the z values are 0 (being that we translated along that axis). In code, we would find and set the data for these attributes:

These two constraints work in tandem to keep the right arm positioned as it was, but limit the elbow to its one core axis of rotation:

All while reducing its anim curves.
Before:

After:

Additionally, this method also works to alleviate any awkward twisting or bending:
