Cinematic Setup Tool


Overview:

The Cinematic Setup tool was created to automatically generate and/or update the core components of a cinematic inside of Unreal's sequencer.

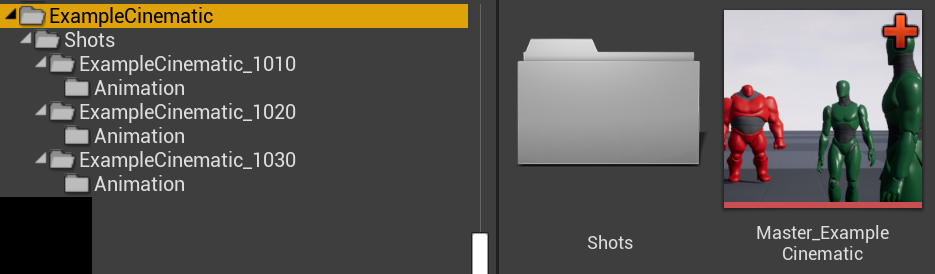
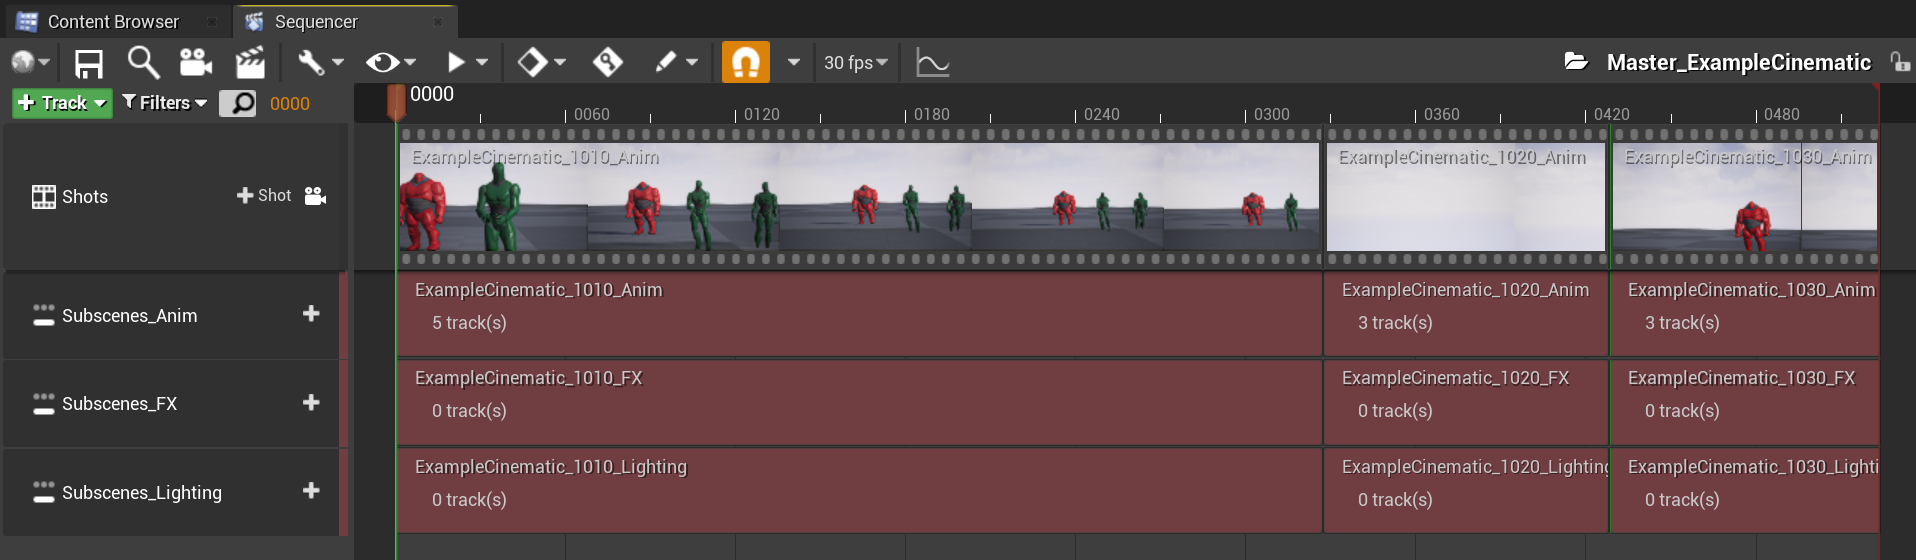
Worth noting, the pipeline this tool was created for utilizes master sequences which contain separate sequences for each shot (broken down into three types of sequence asset per shot:  one for animation, one for fx, and another for lighting).  I set things up this way to enable multiple disciplines to work on the same cinematic simultaneously without blocking each other.

Additionally, the pipeline also works with core levels (referred to as 'persistent levels') and sublevels.  As they pertain to cinematics, each cinematic has it's own sublevel.  These sublevels store all components relevant to the cinematic itself, and allow us the ability to stream this content only when the cinematic is being played (keeping level size and load time to a minimum).

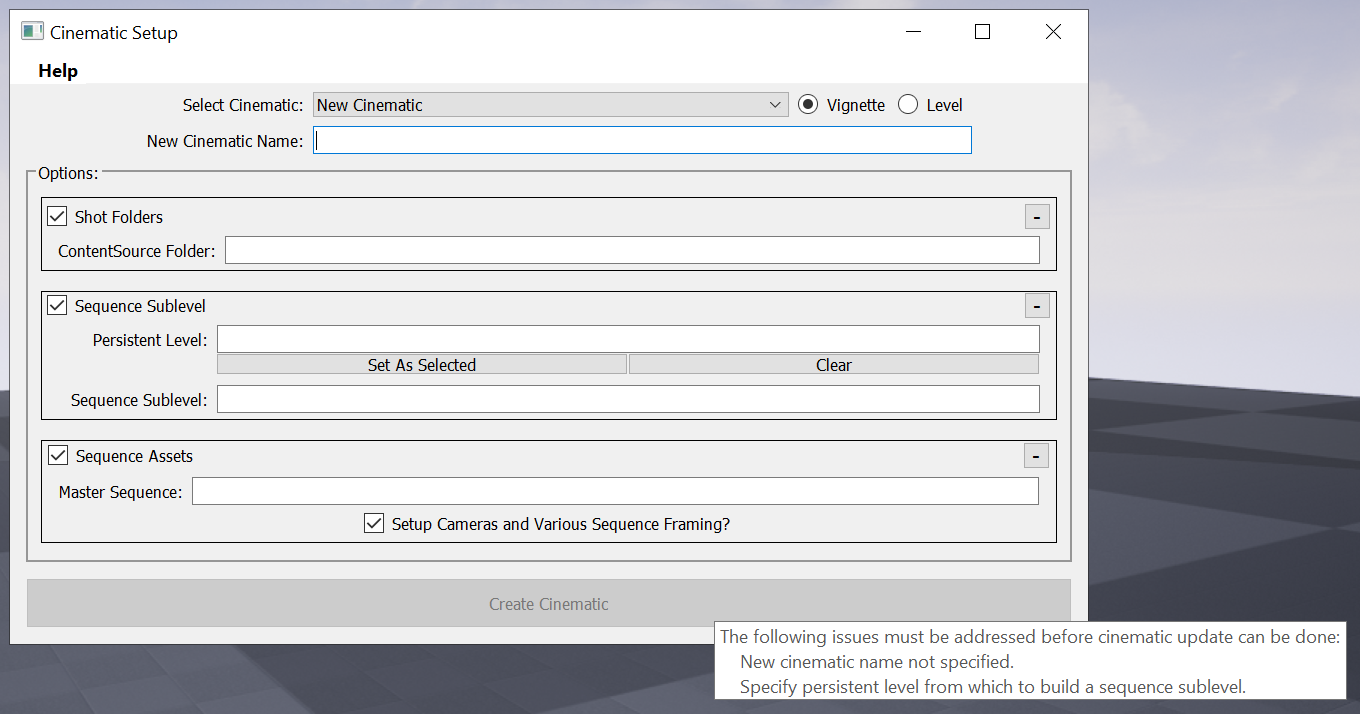
Based off of user selection, the tool has the capacity to:

  • Establish the core shot folders used to store the given cinematics' asset files
  • Generate all sequencer assets for the given cinematic, including it's master sequence and all cinematic shot sequences
  • Setup camera animations for all cinematic shot animation sequencer assets
  • Setup skeletal mesh animations for all cinematic shot animation sequencer assets
    • this includes all bindings and tracks associated with all relevant skeletal mesh actors
  • Setup shot sections and framing in cinematic master sequence
  • Generate a cinematics' sequence sublevel and populate it with:
    • all skeletal mesh actors in the cinematic
    • all cinematic camera actors in the cinematic
    • the cinematics' master sequence as a level sequence actor
      • the tool will also ensure only one level sequence actor instance of said master sequence exists in the sequence sublevel
      • the master sequence level sequence actor will have all tags necessary for our pipeline assigned to it
    • worth noting:  all of these components will be neatly grouped inside of the sequence sublevel and added into a hierarchy of group nodes that further customize move options for the components in the scene without disturbing any sequencer content assigned to them.
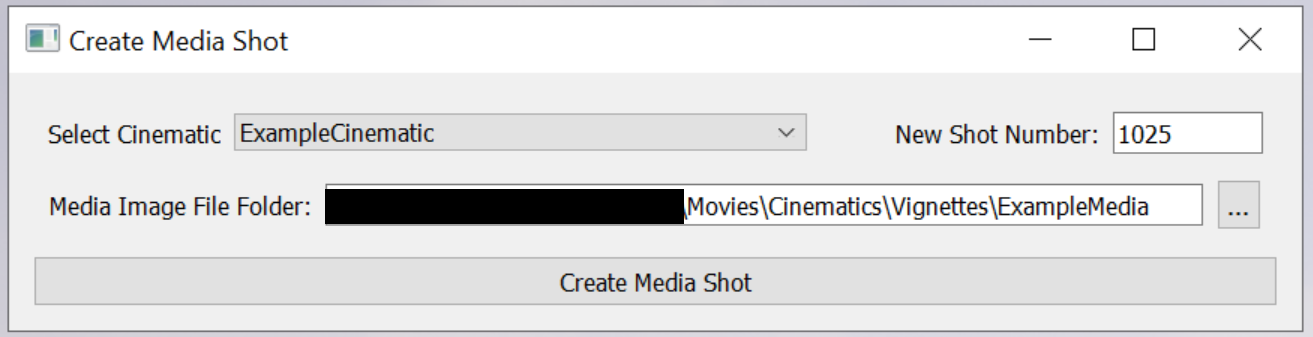
Tool Workflow:

To begin, identify which kind of cinematic you want to work on, and whether or not you are setting up a new cinematic or updating one that already exists.  Worth noting:  if working from pre-existing cinematics, the tool will list all previously generated assets for said cinematic, and assume you only want to generate assets for anything that may be missing.  The checkboxes next to each section (Shot Folders, Sequence Sublevel, and Sequence Assets) tell the tool which assets to generate and/or update, and the tool will only create/modify what is checked.  Any issues preventing the tool from being successfully used will be noted in a tool tip that is visible when hovering over the 'Create Cinematic' button at the bottom of the tool, and the button will be disabled until the tool can verify no errors will be encountered during use:

In this example, we will create a new vignette, composed of 3 shots which we already have animation data for.  These animations have all been named accordingly and placed in the appropriate folders (both the source FBX files as well as the animation uasset files):


When entering a name for the cinematic, the tool will parse our content folder structure.  If a cinematic folder matches the given name, the tool will automatically link to said content folder and determine how many scenes and shots have already been established for said cinematic.

Shot numbering is based on the scene and shot number of a given shot.  For instance, the third shot of the first scene is shot number 1030.  The given pipe uses scene numbers to organize which shots belong in which animation source files.

The list in the shot details portion of the tool contains an entry for each scene.  When selected, the number of shots in that scene will be listed in the 'Shots in Scene' combo box:

The tool is non-destructive and shots and scenes can only be added, never removed.  This ensures that no content is ever accidentally deleted through tool use.  Any shots added to the list will have sequencer assets generated for them, regardless of whether or not there is any source content (like animation).

You will also notice that a master sequence was listed as soon as a name was entered.  All asset naming is controlled by the cinematic name itself.  

The next step is to identify the persistent level that the cinematic takes place in.  Once selected, the 'Sequence Sublevel' category will automatically update to list the sequence sublevel that the tool is going to generate for the cinematic.

Tool Output:

With everything filled out, click the 'Create Cinematic' button and the tool will complete the following:
  • all skeletal mesh actors, cameras, and level sequence actors will be added into a sequence sublevel, which is stored in a subfolder inside your persistent level's directory:


  • an animation, fx, and lighting sequence asset will be generated for each cinematic shot:


  • each animation shot sequence will have it's skeletal mesh actors and camera actors setup in tracks where animations will be applied to them accordingly, and all attributes will be modified to our pipelines specifications:


  • a master sequence will be created, and all shot sequences will be added into the master sequence according to shot number:


Media Track Setup

The Create Media Shot tool is used to automatically set up all media tracks and assets necessary for a media shot in a cinematic.

To use this tool, simply select the cinematic you want to create a media shot for, identify the shot number for the new media shot, and select the media image file folder containing all relevant media files.  

The tool will verify the image file folder provided, as well as the shot number (ensuring it is not already in use within the selected cinematic).

Once verified, the tool will automatically:


  • create new shot sequences for the requested media shot:
  • add a camera and media plane to the cinematics' sublevel:
  • create all media texture and materials necessary and apply them to said media plane*:
  • integrate your new shot into the master sequence of the selected cinematic in appropriate order:


*The created media material used to apply the media texture to the media plane of the shot is set up to act as it's own emissive light source.  No additional lighting is needed to play these shots within the cinematic sequence.

Motion Capture Batch Solver

 The Batch Solver tool was set up to optimize mocap data solving capabilities, as well as quickly process bulk amounts of body capture data.  

The data used in this breakdown was shot via an OptiTrack motion capture system.  The batcher leverages Peel Solve (created by Alastair Macleod) and revolves around the creation of solver assets, which can only be generated and modified via this tool.

The following video breaks down initial setup of a solver asset:


Set up is simplified as much as possible.  The user simply selects a rig, from the list of rigs prepped and stored in our depot, as well as a data file to use for lining up a skeleton to an actor's marker set.

Should the selected file contain more than one actor, the user will be prompted to select their desired marker set.  

The tool will ultimately assemble a scene in which your selected marker set is connected to, and set up to drive, your chosen character rig.  Whether or not the marker set is currently driving the character skeleton is denoted by the enabled/disabled option at the top of the tool, as well as the marker's color in the scene.

The UI will reflect all current connections and contains a list of all joints found in the character skeleton.  When selected from the UI's joint list, all marker connections as well as the marker's current weighting will be listed.  Any joints with no marker connections will be italicized.  


The user is then able to go about adjusting marker set scale and line up the skeleton in the marker cloud.

The goal for working this way is to only have to worry about setting up an asset once per actor per marker set configuration.  To support this, the tool comes with a handful of customization options, to allow the user to go in and fine-tine their solver asset and ensure they are getting the best solve they can.

The next video outlines some of the customization features of the Batch Solver:

These options include the ability to create and detach marker connections on the fly, as well as modify marker weighting.  This is key, as altered marker weights can help overall deformation, such as straightening a leg and keeping feet level with the ground or reducing odd spine bends.  

Additional features include single frame and full scene preview options, as well as the ability to compare marker weighting across multiple joint selections via an easy to read pop up window.

Additionally, you can choose to solve an individual file instead of batching through multiple.  If you elect to do so, the current scene will be updated to fit the newly selected data file.  This will allow you to customize the solve further should that be needed.


This tool also removes all tedium associated with file management, or any need to separate out actors from cleaned files, etc.

In an example, say you are working from Actor 1's solver asset.  You have it open in a scene and are ready to solve that actor's data from a shoot.  All one would have to do is select the folder in which all clean data has been stored and point the tool to a delivery folder.

If said folder was comprised of 5 files in total, and 3 of those moves included the actor:

the batcher will read through and process only the relevant files.

The tool generates a pop up once completed, listing all files that were bypassed and produces a solved file for every applicable move.  

Each move will maintain its original naming with the actor's name added on as a suffix.  The overall idea being you start with one folder of cleaned moves and end with one folder of solved files, one file per actor in each cleaned mocap data file.


The following video is a quick quality comparison.  The slightly grey character on the left had been solved via Motive, the one on the right via this batcher's custom Peel Solve:


In this video, you can see the difference between the two solves.  Motive's solve is pretty rigid, which can negatively impact overall character posturing, as well as introduce conflicting twists in various parts of the body.  The custom solve does not suffer from these same issues and does a better job of respecting the integrity and quality of the original data capture.

Here are some additional examples of the odd twists introduced via the Motive solve in both the neck, knees, and elbows.


Additionally, odd posturing can result from the Motive solve in which the character's back is arched oddly and the shoulders wrench inward.


Shot Request Tool

 The Shot Request tool was created in an effort to streamline the shot request process, to avoid oversights, miscommunications, or missing pieces of information pertinent to a shoot.

This is a Maya based tool, geared towards animator use, as they are the individuals making a request.  It's main goal is to promote organization and get the requestor thinking about what they need and what they want to shoot.  It ensures all involved parties are kept informed via email and generates or contains all elements needed for a successful shoot, making sure that the Mocap team has all they need to facilitate a request.

Filling out a request is as simple as filling out a form.  The tool features a custom calendar widget that links to a calendar in outlook set up specifically for mocap shoots.  Any date in which a shoot has already been scheduled will be greyed out.

From there, the user fills out information regarding the project this data is for, a quick description of the shoot, and what king of delivery data they are looking for (body capture, face capture, virtual camera, etc.).

Additionally, they will set up a shot list, and direct the tool to any assets related to the shoot (things like character rigs and scene geo for real time, props, previz, anything important).  Lastly, they have the option to identify any scripts from our script depot, as well as add in any notes related to their request.  For instance, if anything is missing from the request but they plan to add it in at a later time.

Once a request is submitted, the tool will leverage project, request date, and shoot description info to create a folder for the request.  This folder will contain the given shot list, as well as all assets associated with the request, so that the mocap team can go about setting up a real-time scene, or account for any assets that need to be prepped for delivery purposes.

An email will also be sent out to the requestor and the mocap alias email address.  This email will contain a brief detailing of all shoot information, as well as custom next step call outs based off of which delivery data types were requested.

Scheduling is done through the tool's Approval tab.  This tab is password protected, to ensure only the mocap team can approve and finalize a shoot.

All pending requests are listed in this tab, and once selected a final shot date as well as start and end times for the shoot can be set before scheduling.

Additionally, any pending requests that are no longer relevant can be removed and cleaned out of our pending request folder depot.

When a shoot is scheduled, a final email will be sent out to confirm and a new outlook appointment will be added to the mocap calendar.

The shoot's folders will also be finalized and created for proper data storage and delivery.


Batch Faceware Analyzer

 *Apologies for lack of post-process data.  I removed images and video of the actual actors to avoid any issues with use of their likeness, NDA's, etc.  Instead this breakdown is a quick overview of the batcher used to address bulk amounts of same-actor facial capture data.


The Batch Analyzer tool is a quick way to apply an actor's tracking models to process bulk loads of facial capture data.  The video below outlines use of the tool:


To work with this tool, simply select a folder or folders of facial capture data for an actor.  Worth noting:  all data must be of 1 given actor only.  The tool was specifically designed to handle one actor's tracking models at a time.

You can go through and add and remove facial captures as needed until you have a list of all files you want to process.

Once your list has been established, identify both the desired actor's tracking models as well as their neutral frame file.

In addition to processed FWT analyzer files (in which your actor's eyes, eyebrows, and mouth will be tracked), you will have the option to export out FWR files for use in Faceware Retargeter.  If you elect this option, you will also need to select a delivery folder for all FWR files produced.

Tool output includes:
  • processed FWT files


  • optional cleaned FWR files as well as their image sequences


  • a list of any files that had already been processed and were therefore bypassed